Knowledge base 181: HID Asure ID Software with Identity Access 9

Controlsoft Identity Access 9 install includes a copy of HID Asure ID® 7. This is an ideal choice for organizations looking for affordable and easy-to-use photo ID card software with direct integration with the Controlsoft Identity Access database.

Requirements:
Identity Access 9 installation files (Download from www.controlsoft.com email support@controlsoft.com for login details).
Asure ID License (email sales@controlsoft.com for more information).
Identity Access 9 installation files (Download from www.controlsoft.com email support@controlsoft.com for login details).
Asure ID License (email sales@controlsoft.com for more information).
Installing HID Asure ID:
1. During the Controlsoft Identity Access 9 installation, tick 'Advanced' when you see the screen below:
2. Click [Next] and then tick 'Install Asure ID Card Designer':
3. The AsureID setup will start. First, select the Language you require:
4. Click [Next], then read and [Accept] the License Agreement
5. Select where the Files are to be installed, then click [Next]
6. Following the installation, untick all Installation Options and click [Finish]
7. The Controlsoft Identity Access Installation will then continue
To license Asure ID
Open the Asure ID Card Designer within the Identity Access User Interface select Management then select the Asure ID button
You will be asked to activate the software, using the drop-down box select the version you have ordered (Note: if you have ordered an IA-AID this will be developers edition) and press activate.
Fill out the details box including the license key, then press activate online.
If successful you will receive the following prompt.
If the process fails, check the following.
- Internet access is required.
- Have you entered the correct license key.
- Have you selected the correct version for this license key.
- Has this license already been used. if it has, it will need to be deactivated before it can be reused.
To configure Asure ID
Open the Asure ID Card Designer within the Identity Access User Interface select Management then select the Asure ID button.
Choose your type of card and whether you want a portrait or landscape card.
Next to map a field from Identity Access, click on Data Field from the menu icons and draw a box where you want the information pulled from IA placed on the card. Under Field Name select the Field to be mapped, i.e. IA_FNAME for First Name, IA_LNAME for Last Name, IA_FLNAME for First and Last Name, as shown below.
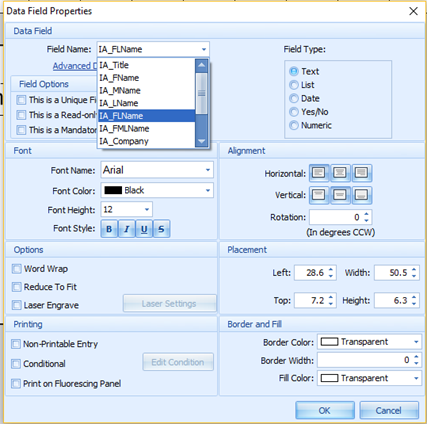
Next to map a field from Identity Access, click on Data Field from the menu icons and draw a box where you want the information pulled from IA placed on the card. Under Field Name select the Field to be mapped, i.e. IA_FNAME for First Name, IA_LNAME for Last Name, IA_FLNAME for First and Last Name, as shown below.
To add a photo to the card, select the Photo icon, then draw a box where the photo is to be placed on the card. Edit the field name to be IA_Photo.
For further detailed information on how to use Asure ID, please refer to the HID documentation installed with the software.
Once you have completed your card design click on File and Save Template. Exit the AsureID Card Designer, then restart the Identity Access User Interface.
Printing a card
To print a card from within Identity Access, select User Admin (Previously Management) and select either Employee / Visitor / Contractor as appropriate.
Click on the User or Users you wish to print (hold down the [Ctrl] key to select multiple Users) and select the Asure ID icon
Select the relevant Template for the user and select Print
Click [Print] and select the required Printer.
If you have any problems with the steps above please email support@controlsoft.com
Installing Asure ID Centrally (Advanced Users Only)
Requirements:
- Central Server with Identity Access 9 installed.
- Central Server with Identity Access 9 installed.
- Microsoft SQL Server Management Studio installed onto the local Identity Access Server
1. On the PC with Asure ID installed, locate the SQL Server script for creating the AsureID databases, this is located under C:\Program Files (x86)\HID Global\Asure ID\Scripts and will be named AsureID_MSSQL.sql If required, copy this file onto the server you wish to centrally manage the AsureID database.
2. On the Identity Access server, load Microsoft SQL Server Management Studio and log in to the Identity Access instance. The following are the default credentials for the Identity Access instance:
Server Name: .\IdentityAccess
Username: sa
Password: C0ntr0lS0ftAdm1n@!
3. Right-click on Databases and select New Database
4. In Database Name type Asure_ID7 and click OK
5. Load the AsureID_MSSQL.sql script. Select Asure_ID7 at the top and press Execute
Mapping AsureID to the Central Database

Before Proceeding please make sure Identity Access and AsureID are both closed on the PC.
1. Login to Identity Access as an Administrator user and go to System > Configuration
2. Select Badge Printing. Under Select Data Source use Microsoft SQL Server
3. Use the following information to fill in the SQL information
Server Name = ServerName\IdentityAccess
Username (Default) = sa
Password (Default) = C0ntr0lS0ftAdm1n@!

If you are unsure of the Server Name being used, you can select Database on the left-hand pane to see how the main application is connected to the Server.
4. Press Accept. Log out of Identity Access and log back in.
Related Articles
Knowledge base 185: HID Mobile Access with Identity Access 9
*Note- Before following this guide you must already have an HID Mobile Access Origo portal with some available mobile credentials, you must also have explained to your Android/iOS users how to download the ‘HID Mobile App’ from the Play Store ...Knowledge base 201: Moving Identity Access
1. Checking your Identity Access License To check whether the current installation is licensed login to Identity Access and go to Home > About. 2a. If the system shows a Professional License or Enterprise License and Version 9.XXX.XX, the license can ...Knowledge base 90: Using MorphoManager BioBridge & Identity Access 8
1. First install Identity Access (IA), follow the Installation Guide available with the download or IA USB Stick. 2. Next log into Identity Access to do this run the IA User Interface – Windows Start Button > All Programs/All Apps> Controlsoft ...Knowledge base 128: How to move the Asure ID License and programs from one computer to another.
This guide is only for customers who purchased AsureID via Controlsoft in the United Kingdom Firstly note your Asure ID license details, they can be found in the file menu, options, licensing page. Please copy your Asure ID database file onto your ...Knowledge base 108: Identity Access 8 - Sigma Series HID Prox 26 bit Settings
This requires an IA-PRO license if you do not have an IA-PRO license please contact sales@controlsoft.com The following Knowledge base describes the 3 options of how to configure Identity Access to work with the Idemia Morpho Series HID Prox ...