Knowledge base 149: ANPR cameras in Identity Access 9

Within Identity Access it is possible to integrate an ANPR camera to operate a barrier. This makes the integration of an ANPR camera seamless for an end user as reporting and adding of new number plates is in the same User Interface as their access control tokens. Number plates are stored under the users secondary tokens meaning they will appear when reporting on a users activity.
Identity Access works with cameras supporting a Wiegand output in the SHA-1 26-Bit Format. Below we show what ANPR cameras we have tested with.

This process has been tested and implemented with:
HIKVISION ANPR camera model numbers:
DS-2CD7A26G0/P-IZHSWG
DS-2CD7A26G0/P-IZHSWG-8-32MM
iDS-TCM403-AI/0411
iDS-TCM403-AI/0832
Dahua ANPR camera model numbers:
DHI-ITC416-PL8I-IZ
1. Camera Installation
Install the ANPR camera as per the manufacturer's instruction manual. Example on how to install and configure a Hikvision ANPR camera can be found in the Appendix.
1.1 Connection with the iNet Door Controller
1. The connections for the ANPR Camera and Reader port using a Belden 9538 reader cable (as per Controlsoft's specification) on the iNet are as follows:
Blue wire: D1 at ANPR – Data 1 on iNet ACU Reader Port
Yellow wire: D0 at ANPR – Data 0 on iNet ACU Reader Port
Black wire: GND at ANPR – GND on iNet ACU Reader Port
2. Setup your controller, door and reader in Identity Access - Information for this can be found within the Identity Access Express Commissioning Guide, Steps 1-8.
3. Run the IA Configuration application from System > Configuration
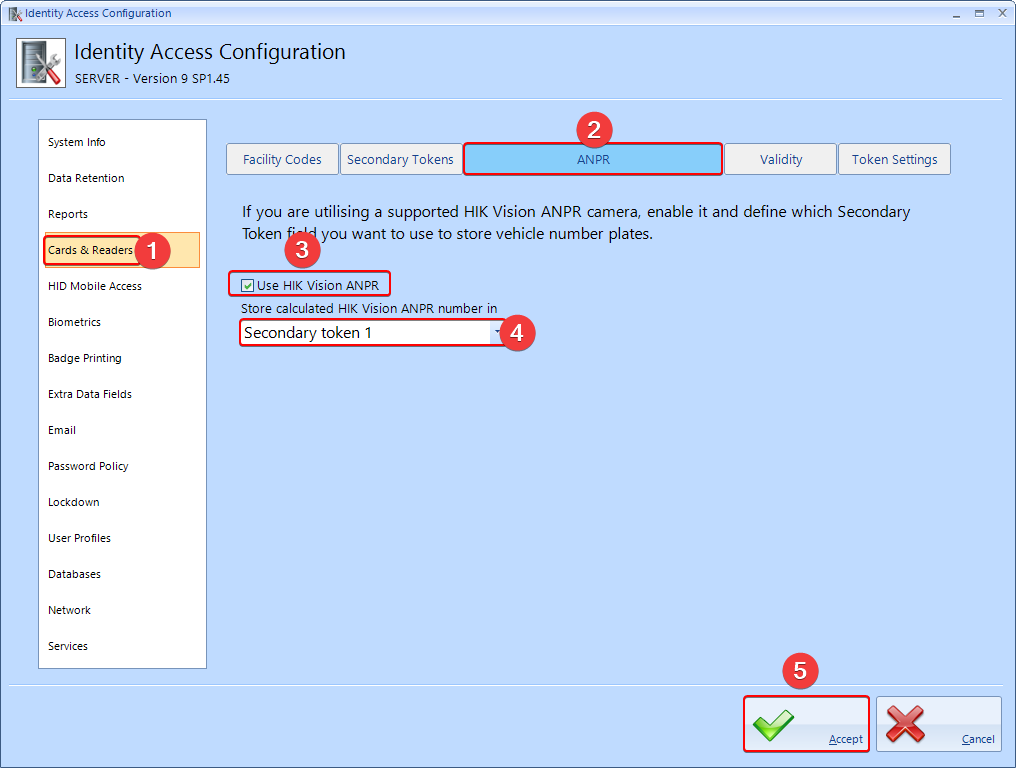
Follow the screenshot and the instructions below -
1) Select Cards & Readers
2) Select ANPR
3) Select Use HIK Vision ANPR
4) Select Which secondary token field you wish to store the ANPR number plate
5) Click Accept
2. Adding a Number Plate to a User
1. Add or Edit a User in Identity Access and select Tokens (shown below), here you will now see the ANPR option, type in the required number plate and click Accept.
It is only possible to store 1 number plate per user using the in built algorithm, however using the Secondary Token field it is possible to perform a conversion and store the number plate in its decimal number format into any of the other secondary token fields.
Any issues with the ANPR setup please contact - support@controlsoft.com
3. Appendix
3.1 Image Settings
There are two modes on the ANPR camera, Road and Normal, as follows, It is recommended to use Road Mode to monitor the road traffic, or if the external environment is too dark at night, Road Mode is also recommended, as follows, Pic 1.
Pic 1
In addition, you can also manually modify/configure the image parameters according to different scenarios, as follows, Figure 1.
Vehicle speed(km/h) | Exposure time(s) | Gain | WDR and BLC |
5 | 1/100 | 20 | OFF |
40 | 1/500 | 20 | OFF |
100 | 1/1000 | 20 | OFF |
200 | 1/2000 | 20 | OFF |
Figure 1
Note: The table is for reference only. The configuration may be different for different scenarios.
3.2 ANPR settings
Configuration >Road Traffic > Tick the Enable box to enable the ANPR feature, and click and drag the yellow lane line to set the position, adjust the zoom ratio of the camera so that the size of the vehicle in the image is close to that of the red frame, Pic 2.
Pic 2
Next choose Wiegand from the menu shown below, tick Enable and choose SHA-1 26bit as shown below -
3.3 ANPR Installation
3.4 Installation angle
When ensuring the camera is set up correctly and the best field of view is set with the lens – make sure the tilt angle of the plate to the horizontal plane is not more than 5 degrees, otherwise you will get poor or incorrect read’s. This road is uphill and with an adverse camber, which causes an offset of the plate to the horizontal plane – this plate still read perfectly well, but with anything more than this there could be problems so check your scene before hand.
Related Articles
Knowledge base 172: Hikvision cameras in Identity Access 9 - Setup parameters
For setting up ONVIF CCTV streaming cameras under the IA Camera Setup page, please use the following URL, remember to change the IP, username, password and remove the chevrons <> - rtsp://<IP ...Knowledge base 181: HID Asure ID Software with Identity Access 9
Controlsoft Identity Access 9 install includes a copy of HID Asure ID® 7. This is an ideal choice for organizations looking for affordable and easy-to-use photo ID card software with direct integration with the Controlsoft Identity Access database. ...Knowledge base 90: Using MorphoManager BioBridge & Identity Access 8
1. First install Identity Access (IA), follow the Installation Guide available with the download or IA USB Stick. 2. Next log into Identity Access to do this run the IA User Interface – Windows Start Button > All Programs/All Apps> Controlsoft ...Knowledge base 201: Moving Identity Access
1. Checking your Identity Access License To check whether the current installation is licensed login to Identity Access and go to Home > About. 2a. If the system shows a Professional License or Enterprise License and Version 9.XXX.XX, the license can ...Knowledge base 103: Moving Identity Access Professional license to a new PC
If Identity Access (v2016.3 or later) includes an IA-PRO or Enterprise license, it is possible to transfer the license to the new PC as described below Run the Licensing Utility on BOTH machines: Select Start > All Programs > Controlsoft > Identity ...