Knowledge base 112: Identity Access 8 – Sigma Series iClass H10301 (26 bit) Settings
This requires an IA-PRO license if you do not have an IA-PRO license please contact sales@controlsoft.com
The following Technical Bulletin describes the 3 options of how to configure Identity Access to work with the Idemia Morpho Series iClass readers to allow for iClass + Biometrics, iClass or Biometrics and iClass Only.
Option 1. iClass Card Only -
1. First ensure the Identity Access software is installed, watch the following video installation guide if needed and you can find the Identity Access Licensing Guide here.
2. Next please install Morpho Tool Box which is found on the IA-STD USB Drive under Extras or you can download it from our website www.controlsoft.com.
Email support@controlsoft.com for login details.
3. Next setup your Morpho Device Profile within the IA Server Configuration application accessed from the Start Menu > All Programs > Controlsoft > IA Server Configuration
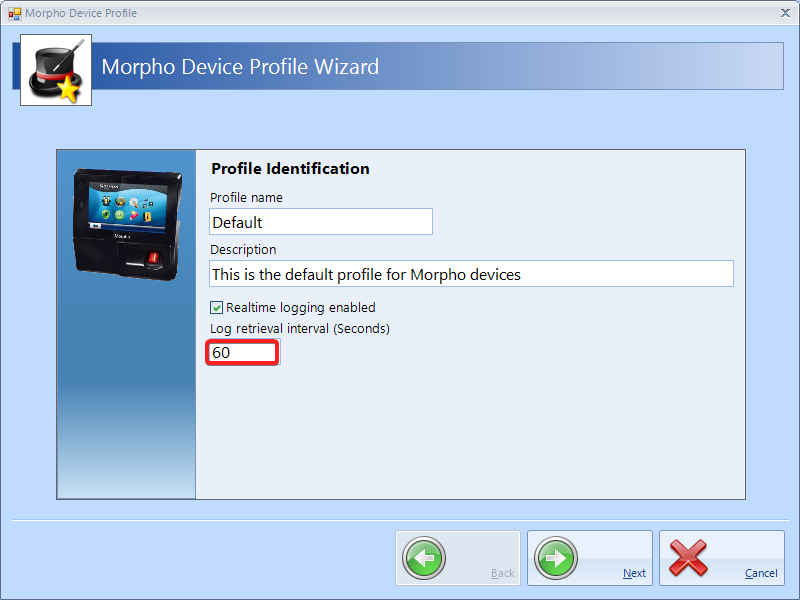
4. Log in & edit the Default Profile by following the screenshot below -
4. Log in & edit the Default Profile by following the screenshot below -
5. Change the "Log retrieval interval (Seconds)" to a minimum of 60 or if using an i-Net ACU disable this setting altogether by unchecking "Realtime logging enabled" as the i-Net handles the logs.
6. Choose "26bit Wiegand" and select “i-Net ACU Mode” when connected to an i-Net Door Controller, or “Standalone” when the reader is being used as a Single Door Controller.
7. Add the Morpho Device into the IA User Interface, select the Biometric Device Profile you have edited and select “Accept Users with no fingerprints”.
8. Load the Download Server and click on Biometric Devices, click Refresh list. Ensure the reader comes online and perform a rebuild. Once the Device Status is “Ready” and the Tasks are 0 go to the next stage.
9. Go back to the IA User Interface and double-click the Morpho Device. Under Device Profile select “External Profile”.
10. From the IA User Interface add a new Group. Management > Groups > Click the green plus icon. 
11. Give the group a name and then select the "Morpho Readers" tab in the Group Properties and tick the reader you created earlier.
12. Click Accept.
13. Open Morpho Tool Box (MBTB) and connect to the Device.
14. Click on the Key Configuration icon. 
15. Scroll Down and change the settings below by clicking the entry in “Local”, changing the entry and click the Green Tick.
| Local Setting | Value |
| sc.verify_user_id | 5 |
| ucc.per_user_rules | 0 |
| ucc.user_record_reference | 1 |
| ucc.trigger_event | 2 |
16. Click the “Write” Button.
17. Now enroll an Employee token to the system without enrolling the Biometrics.
Option 2. iClass Card OR Biometric under 1 user -
1. Follow the same as above but when it comes to enrolling an employee you enroll the biometrics along with the Token by clicking the Fingerprint tab.
Option 3. iClass Card + Biometrics (Dual Authentication) -
1. Follow steps for option 1 above, but for the MBTB settings use the following instead -
Local Setting | Value |
sc.verify_user_id | 5 |
ucc.finger_bio_auth_rule | 1 |
ucc.per_user_rules | 0 |
ucc.user_record_reference | 1 |
ucc.trigger_event | 2 |
2. Now enroll an Employee, the Token Number should be the employee's card number and enroll their biometrics under the same user.
Biometric enrollment video guide found here if needed - https://youtu.be/JLQexwoIBfU
Biometric enrollment video guide found here if needed - https://youtu.be/JLQexwoIBfU
Related Articles
Knowledge base 111: Identity Access 8 – Sigma/Sigma Lite iClass Series – IA-CRD Settings
This requires an IA-PRO license if you do not have an IA-PRO license please contact sales@controlsoft.com The following Knowledge base describes the 3 options of how to configure Identity Access to work with the Idemia Sigma Series iClass technology ...Knowledge base 102: MorphoManager with MA Sigma iClass series – HID iClass (Standard 26bit) + Biometrics
It is possible in MorphoManager to set up the MA Sigma/ Sigma Lite Series readers in a Biometric + HID iClass mode. This bulletin will explain how to configure the system where a user must present a card & their biometric before being allowed access. ...Knowledge base 138: Identity Access 9 - Sigma series with a Wiegand In reader
This feature requires an IA-PRO license if you do not have an IA-PRO license please contact sales@controlsoft.com The following KB describes the 3 ways of configuring a Sigma series biometric reader with a Wiegand in reader for either 1) Wiegand IN ...Knowledge base 178: Identity Access 9 - Sigma series reader with an LCD display for Pin & Biometric
This KB explains how to create a custom Biometric profile for a Sigma Series reader (LED Model required) for Pin & Bio using Identity Access version 9. This KB is based on the Biometric reader being wired into an i-Net Plus V3 door controller and ...Knowledge base 186: IDEMIA Morpho Readers with Identity Access 9
This document will cover how to set up an IDEMIA biometric reader using direct integration in Identity Access. Requirements An IDEMIA Biometric reader (Sigma Wide, Sigma Lite, Sigma Lite + or Sigma Extreme) PC running Identity Access (IA) with a ...